Showing posts with label evening gown. Show all posts

Friday, March 14, 2014

Making an 1814 evening gown from Ackerman's Repository

A white crape, or fine muslin petticoat, worn over white satin, embroidered in silver lama round the bottom. A bodice of olive, or spring green - green satin. ornamented with a silver stomacher. Short, full sleeve, rounded bosom, trimmed with a full silver border to correspond. A fan frill of fluted lace, continued around the back, and terminated at the corner of the bosom. A silver fringe round the bottom of the waist. Ackerman's Repository March, 1814.
I choose this gown for my Jane Austen Festival Australia 1814 challenge. It was simple, elegant and relatively easy to recreate. Or so I thought. Little did I know that it would become the 1814 bodice from hell!

I went shopping for some green satin at the local fabric stores, everything but green of any kind.  I bought all the trims, the silver plastic 'lama' ribbon for embroidering, silver fringing and two mother of pearl buttons for the sleeves.

I went home and searched through my stash for fabric to go with the silver. I decided on a royal blue saree silk Georgette that I could interline with a pale blue taffeta. Blue and silver always look well together.

To create the 'rounded bosom' bodice, I cobbled various Regency pattern drafts together. For fitting, I'm using my paper paste dummy that was created over my stays. Its actually slightly bigger than I am due to the T-shirt and paper, which means I can make the gown nicely tight, but on my more malleable body it will be comfortable. You can make one for yourself, it saves you having to put stays on and off for fittings. Plus fitting oneself is NEVER easy!

 The gown apperared to have a sweet heart neckline so I cut one in, but then I realised that it was the stay busk separating the bosom and so didn't continue with it.

As there was no back shown, I made my standard Regency triangle back. So far so good.

Now the trouble starts, a stomacher to me is an 18th and earlier front in a V shape, often covewred by lacing. Its highly embroidered and decorated. The one below from the Museum of London is a beautiful example.
Stomacher for a spitalfields woven silk Court dress. The stomacher is roughly triangular, with a straight bottom edge; trimmed with eight rows of metal thread braid with bows and tassels alternating with seven rows of ivory, yellow, purple, green and pink silk rosettes; edges finished with cream silk tape. The Court dress was traditionally thought to have been worn by Mrs. Ann Fanshawe when her father, Crisp Gascoyne, was Lord Mayor of London in 1752-53. Mrs. Fanshawe acted as her father's Lady Mayoress as her mother had died in 1740. Image from Museum of London
This what I had in my mind, so why did I go off in some weird 'Heidi or Snow White meets Regency' fantasy land? Reader, I know not, but off into this land I went and here's the results.

Now, admittedly, I was using the blue ribbon as it showed up better on the calico, so at first I thought, 'Its just the colour'. WRONG! I pinned on a coloured sheer skirt that I thought I might use, but it was too green for the blue. I then added the lace, now I was really in Disneyland...

... but still I persisted in my blindness to the fashion fabric, grrrr! Does this look like Snow White I ask you dear Reader?!?!?!
I have no picture of the sleeves on the above bodice, but trust me, I would have been singing to the seven darves!

I frog stitched off the front pale blue stomacher and moved to the next version. I thought that as the stomacher was unseen in the image I could be as creative, or not, as I liked. So I placed a single line of silver 'lama' down the front. This looked better and I started to relax, but a very lame (pun intended) attempt at a stomacher! I couldn't leave it at that.

Having solved the stomacher issue, or so I thought, I added the skirt. I needed a sheer fabric and the only one I could get was a sheer spotted polyester, plastic as hell. Honestly our local fabric shops get worse and worse, no wonder I mostly buy online. Sadly I left this project too late in the day to fetch good silk from OS.
Skirt on, I continued to fiddle with the stomacher again and the spotted sheer isn't anywhere near as drapey as I would like. I don't like the lace either, still smacks of Snow White.

Final fiddle with the stomacher. I think this version is best and frankly I'm over this dress.


It should have a satin underlining but I will wear it over my muslin petticoat as I'm not wasting more time on it. I hope I like it more when its on me, but as I'm still making my new short stays, that has to wait for the weekend.

My next project is an 1814 day gown from Ackerman's, hopefully I will enjoy the process more!

***********************************************************************************************

I'm The Tailor's Apprentice, maker of The Miss Page 1940s reproduction patterns, gowns developed from pattern pieces found amongst the remnants of Miss Violet Florence Page’s life and work. Affordable, elegant, and unique garments from the 1940s war years. 

All my patterns are available on Etsy and my website where you'll find out more about me as well. This year I am publishing an 1820s gown wardrobe pattern and have already published the Australian Army Nurses Services WWI uniform pattern.


If you'd liked to be included on my mailing list for events, pattern release dates and interesting snippets about vintage and historic sewing, please subscribe to my Newsletter on The Tailor's Apprentice website.


Monday, November 11, 2013

Making my Veronica evening gown and capelet from my WWII pattern series: preparing the downloaded e-pattern

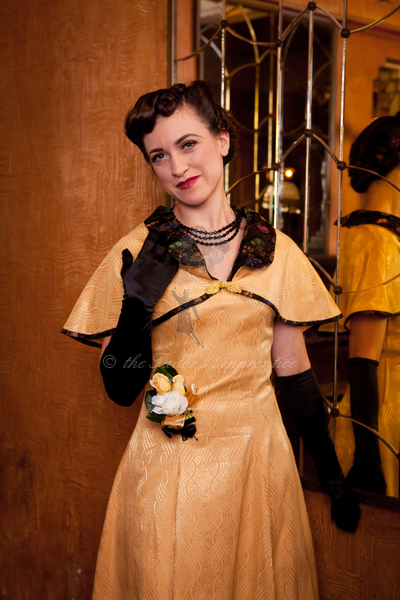
Veronica evening gown and capelet
A friend is having a 'wear something glamorous from any time period' NYE party and as my sewing commissions often keep me from sewing lovely things for me, I decided to set myself a challenge and make my Veronica evening gown and capelet from my WWII pattern series between now and then... and blog about it as I go.

Veronica was created from an extant WWI patten drafting book that came from Miss Page's personal sewing memorabilia. Miss Page is the inspiration for my vintage patterns as I am lucky to hold a small collection of her hand sewn vintage garments, sewing patterns, books and other memorabilia from her life as a dress maker in the Blue Mountains where I live.

Veronica is an example of mid-war pattern cut, when fabric restrictions and ration cards dictated what you could make. Its frugal with fabric, but still lovely and drapes divinely. The caplet provides an added dressy touch and keeps the chill off should you wander out to the verandah for a chat and rest from dancing.

The pattern comes in three PDFS, the e-pattern, the pattern notes and the 'How to put the pattern together' documents. When you buy it, you are sent all three immediately.

In this post I am showing you how to put your e-pattern together after you have printed it out.

How to print:
You can download the pattern to a memory stick and take it to a printer to print out on one, or more sheets ... or ... do what I do and print on my home printer.

When printing at home, set your printing scale to 100% or 'no scaling' to ensure the pattern prints correctly for you and your paper. Also print off page 1a, the test print page, first and check that your grid measures 1" x 1".

The pattern is designed to fit both A4 and 'Letter' size paper that most of us have in our home printers. Depending on the paper type you use, you may have white edges to trim so the pattern joins correctly. You can see that I need to do this on my Australian A4 paper in the left hand image above.

Why e-patterns?
I create e-patterns for many reasons. The first is that in Australia I can't get patterns printed at a cost that makes it possible to sell the pattern on to the customer. The second is that an e-pattern is immediate, you buy it, you receive it, you stick it together and you start creating. If your impatient like me, having to wait many weeks for a pattern to arrive through 'snail mail' is very frustrating. If I want to make it, I want to do it today! The third reason is that its better for the environment, patterns don't get printed until they are needed.

Let's put the pattern together:
Every The Tailor's Apprentice pattern page is clearly marked so joining it altogether is easy. A series of numbers and letters are used for each separate printed page, for example:

1a, 1b, 1c, 1d, 1e, 1f, 1g, 1h, 1i, 1j, 1k
2a, 2b, 2c, 2d, 2e, 2f, 2g, 2h, 2i, 2j, 2k
3a, 3b, 3c, 3d, 3e, 3f, 3g, 3h, 3i, 3j, 3k
4a, 4b, 4c, 4d, 4e, 4f, 4g, 4h, 4i, 4j, 4k
5a, 5b, 5c, 5d, 5e, 5f, 5g, 5h, 5i, 5j, 5k
6a, 6b, 6c, 6d, 6e, 6f, 6g, 6h, 6i, 6j, 6k
7a, 7b, 7c, 7d, 7e, 7f, 7g, 7h, 7i, 7j, 7k

This enables you to join each consecutive piece together row by row.

The first page, 1a, the test print page, also gives you the pattern layout so you can use this to follow the pattern layout on your bigger pattern pieces.

I use my cutting bench to piece the pattern together, others use a kitchen table, even the floor. Do whatever makes you the most comfortable. I slide the pattern over the edge as it grows. Piece the pattern pages together row by by row, ensuring that you check your 1" grid at page joins.
I sometimes fold the unwanted paper over rather than cutting it. Both methods work well. In the picture to the left you can see me setting up the second row of pattern pages.

Its exciting watching the pattern grow as you join it up.


Yes, sometimes, even with all your careful work you can go slightly out as I have in the picture on the left.

This is no big deal, I mark it on the pattern so I know to correct when I cut the dress out and I ensure I correct the error with the next pieces.

Adjust the pattern for YOUR body:
Finally the pattern is created and is ready to be altered to my specific body type. No commercial pattern is made to fit you or me, its based on a pattern sizing of a 'Ms Average, who only exists in a small part of the population. Most of us are different.

For example, the waist length on my patterns is 16", I'm 14.5" and always have to correct it by shortening it at the appropriate marking on the pattern. 'Ms Average' is also 5'6", I'm 5'4", so I have to shorten the hem considerably at the appropriate marking before cutting.

This saves time and fabric if you adjust the pattern now.

I need to take out 5" of the length at the Lengthen/Shorten line for the skirt length.

I fold up to the mark place, stick the pattern together.

Then draw a new skirt line at the sides to the correct angle and trim away the excess.  I do this for all pieces of the pattern. Doing this to the skirt hem length means I keep the drape of the original pattern around my feet. I keep all that lovely twirl factor.

Making the test dress (toile):
Next post we will walk through creating the toile to fit my curves. My body shape varies from a 16 to an 18 and I have compensated for this in the pattern before cutting the pieces, but a toile will ensure that I can tweak the changes, especially as I've lost some weight recently and that will affect the fit.


***********************************************************************************************

I'm The Tailor's Apprentice, maker of The Miss Page 1940s reproduction patterns, gowns developed from pattern pieces found amongst the remnants of Miss Violet Florence Page’s life and work. Affordable, elegant, and unique garments from the 1940s war years. 

All my patterns are available on Etsy and my website where you'll find out more about me as well. This year I am publishing an 1820s gown wardrobe pattern and an Australian Army Nurses Services WWI uniform pattern.


If you'd liked to be included on my mailing list for events, pattern release dates and interesting snippets about vintage and historic sewing, please subscribe to my Newsletter on The Tailor's Apprentice website.


Wednesday, January 2, 2013

Historical Sew Fortnightly - #1 Challenge

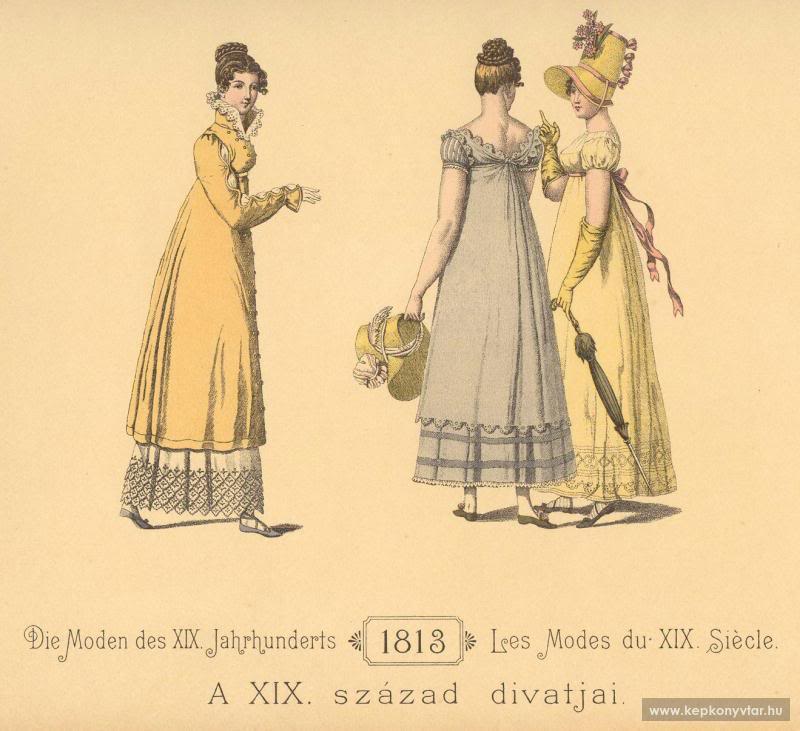
A XIX. század divatjai. Collection Geszler. - Die Moden des XIX. Jahrhunderts
 #1: Bi/Tri/Quadri/Quin/Sex/Septi/Octo/Nona/Centennial – due 14 Jan.  Sew something from __13, whether it be 1913, 1613, or 13BC.

For challenge #1 for the Historical Sew Fortnightly I am creating the pattern and toile for the 1813 blue gown in the centre of the image on the left. This fits in nicely with my JAFA Costuming Challenge to create an 1813 gown for the Jane Austen Festival Australia in April this year to celebrate the bicentennial of Jane Austen's, Pride and Prejudice.

 Its nice to be able to complete two challenges with the same outfit, win win all round!

My lovely wife gave me 10 metres of blue silk taffeta for Christmas to make this gown and the pelisse on the left. I hope to also make the white dress under the pelisse and a version of the yellow gown on the right, but in a different colour, as yellow and I clash badly!

RESEARCH: 
Books:
  • Norah Waugh, The cut of women's clothes 1600-1930
  • Nancy Bradfield, Costume in detail 1730 - 1930
  • Sarah Jane Downing, Fashion in the time of Jane Austen
  • A XIX. század divatjai. Collection Geszler. - Die Moden des XIX. Jahrhunderts
  • Jean Hunnisett, Period costume for stage & screen: patterns for women's dress 1800-1909
  • Janet Arnold, Patterns of Fashion 1: Englishwomen's dresses and their construction c. 1660-1860
Interwebs:
I trawled the web like a madwoman and pinned the results to my 1813 Pinterest board.

THE TOILE:

I spent an afternoon draping my bodice. I decided to keep the same V-neck front and back as there were other European fashion drawings with front V-necks in 1813. Bodices were extremely high at this period in Europe, they sat at the underarm.

 The back:

I think I have the style, I pleated the centre back to get the ruched looked.

I created a mock trim and added a sleeve to get a better feel. 


The front:

Not sure I'm pleased with it, think I may add the back ruching.


Back to the research, I really want the bodice front depicted in the 1813 French gown below, supposedly the first wedding gown with veil depicted in the 19th century.

In Norah Waugh's The cut of women's clothes, I found a bodice that would work. The style is 1803, 10 years earlier, but it gives me the shape I am want and I can tweak it happily.

Here is my paper mock-up.

Here is my new design of the bodice and I'm much more satisfied with it.

Front

Back
This has been a hard fortnight for me, we have had a horrible heat wave in the Blue Mountains with extreme fire danger, not a happy occurrence in the Australian bush! Our bushfire plan is to leave, so our bags were packed, hardrives and laptops all ready to go quickly if we were threatened by fire. Thankfully this didn't occur for us, but it did for many others across NSW and my heart goes out to them. The Australian Red Cross is accepting donations to help the burnt out bushfire victims if you'd like to help and contribute.

The heat made me unmotivated, I hate high temps, they really knock me around. A cool change came through today so I restarted my 1813 bodice with the different pattern above and finished the toile, it works, but it's a pretty lame attempt for Challenge #1 as its not a completed item as I didn't drape the toile skirt, nor have I tried the bodice on with the correct underpinings. However it is the start of a beautiful 1813 gown and I will post further progress on this gown as I continue. 

I'm back at work tomorrow sewing commissions for others, so not sure which challenges I'll be able to work on, but I am here in spirit and admiring everyone's work. 

Just the facts, Ma’am: Aimed for a completed toile for an 1813 full dress gown. Didn't succeed, only managed the bodice.

Fabric: Calico in my stash.

Pattern: A pattern created by Norah Waugh from an extant gown in 1803

Year: 1813 AD

Notions: Thread and pins.

How historically accurate is it? As accurate as I can make it, based on an extant pattern and adapted to fi my figure and the image.

First worn: Not yet.

Total cost: "free' as I used stash fabric, books from my library and notions also in my stash.

I'm The Tailor's Apprentice and I have created The Miss Page Vintage Pattern Collection. 1940s WWII dress making patterns for the 21st century woman. Patterns created by me from my extant 1940s gowns. All my patterns are available on Etsy and my website where you'll find out more about me as well. This year I am publishing an 1820s gown wardrobe pattern.