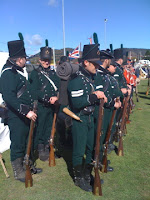
I made myself a long sleeved Regency Pelisse or Redingote (coat) last week to keep me warm and cozy at IronFest in Lithgow where the Battle of Lithgow was fought valiantly by Bonaparte's troops and our brave 95th (Rifle) Regiment of Foot, 2nd Battalion (Australia)
The 2011 IronFest theme was SteamPunk and Regency is much earlier I know, but as my partner and I both missed out on the Jane Austen Festival Australia the week before Easter as our sweet dog Astro was lost by his carer, well, we are going to be time travellers and wear our Regency garb!
 |
| 1807 Redingote |
I based my Redingote on the image to the right, an 1807 Redingote--walking dress with silk and mohair ottoman Kashmir wool shawl from the Kent State University Museum. I love the rich colour of this coat, it is glorious, I wish I had such beautiful fabric in my stash. I love the bands at the bottom and the belt detail.
 |
| Mystery purple and green trim |
I used a deep purple 'mystery' fabric that I bought a few years back in a second hand shop, it feels like wool, but doesn't pass the burn test, still an all, I have enough of it and that's the deciding factor. The green velvet trim is left over from a Burgundian I made a few years back, its lush upholstery cotton velvet. The lining is a greeny gold
 |
| Lining |
I used the Sense and Sensibility Pelisse pattern as the basis for my Redingote and tweaked it to match these images, mostly.
This blog post is dedicated to @SuzieWong66 who suggested I discuss my process.
It took me two full work days and a couple of nights to complete the redingote, well to a wearable stage, when I wore it on Saturday it was sans buttons, back belt, wrist tabs and two ribbon bands!
Stage 1 - The bodice lining:
 The lovely 1807 Redingote has a cross breasted bodice, similar to the dress styles of the same period, I did intend to do this, but a 'more haste less speed' error had me cutting out the collared pattern and not adapting it, which is a shame, because this one is so different, but my next one will use this detail.
I like Sense and Sensibility patterns, they are well researched and they fit me well, I know if I cut it out I won't need to do any adjustments and I no longer need to make a toile. So when I put together my bodice lining and the armholes were too tight, I couldn't understand it, I trimmed them down and continued on my merry way, only to discover that I had put the back bodice together upside down! As I said earlier "more haste less speed"
 |
| Back bodice lining - incorrect |
 |
| Stitching the darts. |
I didn't realise however until I had the sleeves on, a huge do'h moment! As it was the lining, it caused few issues, and its a good lesson in paying attention, even experienced tailors make silly errors and thankfully this one didn't cause any problems. Having made the mistake with the lining bodice, I ensured the fashion fabric was put together correctly. The bodice went together well as you can see from the photos.
The sleeves fitted like a dream once I had the back panel correct, nothing like a bit of frog stitching in a 'quick quick' project to make you concentrate!
Stage 2: The skirts:
Adding the skirts is the easiest part of all, they are just gathered rectangles of fabric. I used the back skirt pattern from Sense and Sensibilities Elegant Ladies Closet as it gives a lovely back drape and a small train, which is indeed very elegant.
 I added the bottom velvet band trim first, its easier to handle so much fabric without a bodice attached. I wanted three, but needed to fiddle with the green velvet and so ended up with one. I usually hand stitch all outside pieces but I didn't have time. Thankfully the cotton velvet is very thick and the machine stitches were lost in the pile.
I then stitched the lining to the skirt fronts.
The only difficult part of the skirt is ensuring that both the lining and fashion fabric are evenly gathered and then attaching all that gathered fabric to the bodice. When I have so much fabric to gather I do it in smaller sections, in this instance in quarters and I gathered the lining and fashion fabrics separately.
Also, I always hand tack difficult pieces together, this ensures that everything is in the right place before machine stitching and less chance of a broken needle in a thick and difficult bit of seam as well, both my fabrics were quite thick, especially the mystery purple.
 |
| Hand stitching bodice to skirt |
Once the skirts were attached I could then hide the seams and gathering with the bodice lining and so the redingote looks good both inside and out.
Stage three: Hand sewing
To get my redingote ready for the weekend, I needed to hem the skirts and the sleeves and this was easily done listening to a fabulous Renaissance concert on ABC Classic FM.
 |
| Stitching lining to sleeve |
Stage 4: Wearing it at IronFest
I was so glad I made my redingote, a wool shawl would not have cut the freezing weather at Lithgow! I didn't have time to do the buttonholes, so I used a broach to keep it closed.
The day was fabulous, IronFest is always a blast, but even better when you get into the excitement of it all and join the re-enactors.


