
 |
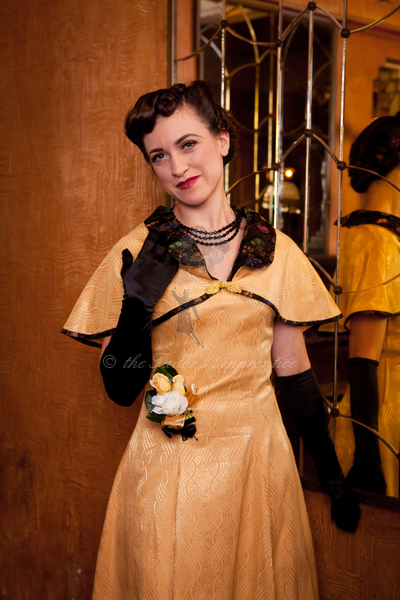
| Veronica evening gown and capelet |
Veronica was created from an extant WWI patten drafting book that came from Miss Page's personal sewing memorabilia. Miss Page is the inspiration for my vintage patterns as I am lucky to hold a small collection of her hand sewn vintage garments, sewing patterns, books and other memorabilia from her life as a dress maker in the Blue Mountains where I live.
Veronica is an example of mid-war pattern cut, when fabric restrictions and ration cards dictated what you could make. Its frugal with fabric, but still lovely and drapes divinely. The caplet provides an added dressy touch and keeps the chill off should you wander out to the verandah for a chat and rest from dancing.
The pattern comes in three PDFS, the e-pattern, the pattern notes and the 'How to put the pattern together' documents. When you buy it, you are sent all three immediately.

How to print:
You can download the pattern to a memory stick and take it to a printer to print out on one, or more sheets ... or ... do what I do and print on my home printer.
When printing at home, set your printing scale to 100% or 'no scaling' to ensure the pattern prints correctly for you and your paper. Also print off page 1a, the test print page, first and check that your grid measures 1" x 1".
The pattern is designed to fit both A4 and 'Letter' size paper that most of us have in our home printers. Depending on the paper type you use, you may have white edges to trim so the pattern joins correctly. You can see that I need to do this on my Australian A4 paper in the left hand image above.
Why e-patterns?
I create e-patterns for many reasons. The first is that in Australia I can't get patterns printed at a cost that makes it possible to sell the pattern on to the customer. The second is that an e-pattern is immediate, you buy it, you receive it, you stick it together and you start creating. If your impatient like me, having to wait many weeks for a pattern to arrive through 'snail mail' is very frustrating. If I want to make it, I want to do it today! The third reason is that its better for the environment, patterns don't get printed until they are needed.
Let's put the pattern together:
 Every The Tailor's Apprentice pattern page is clearly marked so joining it altogether is easy. A series of numbers and letters are used for each separate printed page, for example:
1a, 1b, 1c, 1d, 1e, 1f, 1g, 1h, 1i, 1j, 1k
2a, 2b, 2c, 2d, 2e, 2f, 2g, 2h, 2i, 2j, 2k
3a, 3b, 3c, 3d, 3e, 3f, 3g, 3h, 3i, 3j, 3k
4a, 4b, 4c, 4d, 4e, 4f, 4g, 4h, 4i, 4j, 4k
5a, 5b, 5c, 5d, 5e, 5f, 5g, 5h, 5i, 5j, 5k
6a, 6b, 6c, 6d, 6e, 6f, 6g, 6h, 6i, 6j, 6k
7a, 7b, 7c, 7d, 7e, 7f, 7g, 7h, 7i, 7j, 7k
This enables you to join each consecutive piece together row by row.

The first page, 1a, the test print page, also gives you the pattern layout so you can use this to follow the pattern layout on your bigger pattern pieces.
I use my cutting bench to piece the pattern together, others use a kitchen table, even the floor. Do whatever makes you the most comfortable. I slide the pattern over the edge as it grows. Piece the pattern pages together row by by row, ensuring that you check your 1" grid at page joins.
 I sometimes fold the unwanted paper over rather than cutting it. Both methods work well. In the picture to the left you can see me setting up the second row of pattern pages.
 Its exciting watching the pattern grow as you join it up.
Yes, sometimes, even with all your careful work you can go slightly out as I have in the picture on the left.
This is no big deal, I mark it on the pattern so I know to correct when I cut the dress out and I ensure I correct the error with the next pieces.
Adjust the pattern for YOUR body:

For example, the waist length on my patterns is 16", I'm 14.5" and always have to correct it by shortening it at the appropriate marking on the pattern. 'Ms Average' is also 5'6", I'm 5'4", so I have to shorten the hem considerably at the appropriate marking before cutting.
This saves time and fabric if you adjust the pattern now.


I need to take out 5" of the length at the Lengthen/Shorten line for the skirt length.
I fold up to the mark place, stick the pattern together.
Then draw a new skirt line at the sides to the correct angle and trim away the excess. I do this for all pieces of the pattern. Doing this to the skirt hem length means I keep the drape of the original pattern around my feet. I keep all that lovely twirl factor.
Making the test dress (toile):
Next post we will walk through creating the toile to fit my curves. My body shape varies from a 16 to an 18 and I have compensated for this in the pattern before cutting the pieces, but a toile will ensure that I can tweak the changes, especially as I've lost some weight recently and that will affect the fit.
***********************************************************************************************


I'm The Tailor's Apprentice, maker of The Miss Page 1940s reproduction patterns,
gowns developed from pattern pieces found amongst the remnants of Miss
Violet Florence Page’s life and work. Affordable, elegant, and unique
garments from the 1940s war years.
All my patterns are available
on Etsy and my website
where you'll find out more about me as well. This year I am publishing
an 1820s gown wardrobe pattern and an Australian Army Nurses Services
WWI uniform pattern.
If
you'd liked to be included on my mailing list for events, pattern
release dates and interesting snippets about vintage and historic
sewing, please subscribe to my Newsletter on The Tailor's Apprentice website.
No comments:
Post a Comment
I love to read your comments and thoughts on my posts.